I set a pretty average goal for myself a couple months ago to blog about all the ways to use algebra tiles. But then of course life got in the way and here I am only on post #3-- how to use algebra tiles to multiply polynomials. I'll get there, but it may take more time than anticipated!
New to algebra tiles? Watch my algebra tiles tutorial video here.
Example 1:
The large blue square is now there to show (x)(x) = x2. Now, because (+)(-) = (-), we will stack 4 (-x) rectangles horizontally below our blue x2 to show (+x)(-4).
If you'd like to learn more about ways to use algebra tiles, I have put together an algebra tiles tutorial video that covers ways to use algebra tiles in middle school math.
My favorite use of algebra tiles is for factoring quadratics, especially where the A value is greater than 1. Using the tiles makes this process so much more concrete than any other method (in my opinion). Because it's my favorite, I jumped to blog about it first. But before we even get to factoring, we learn how to multiply the binomials, which is what this post is about.
But first! If you don't have a set of algebra tiles, here is a free set of printable paper algebra tiles. If you print on 2-sided card stock (like Astrobrights) it'll mimic the positive and negative sides of the plastic tiles.
Example 1:
Multiply (x + 3)(x - 4)
Algebra tiles come in 3 shapes: large square (for +/-x2), long rectangle (for +/-x) and small square (for the +/- constant values).
The goal of using them to multiply polynomials is to build a rectangular area. This area will have side side lengths of the two binomials you are multiplying (the picture above shows this better than I can put into words).
The goal of using them to multiply polynomials is to build a rectangular area. This area will have side side lengths of the two binomials you are multiplying (the picture above shows this better than I can put into words).
The large blue square is now there to show (x)(x) = x2. Now, because (+)(-) = (-), we will stack 4 (-x) rectangles horizontally below our blue x2 to show (+x)(-4).
Now we lay 3 (+x) rectangles vertically to show (+x)(+3).
Lastly, we just fill in the space to complete this rectangular-shaped puzzle. (+)(-) = (-), so we need 12 small (-) constant tiles.
Example 2:
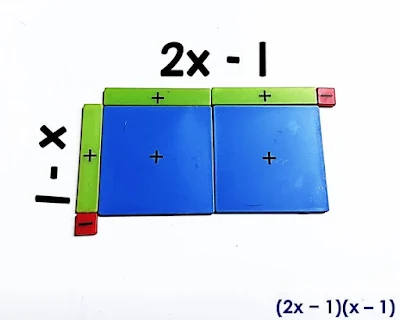
Multiply (2x - 1)(x - 1)

This is the exact same process as Example 1, except we'll use 2 big blue x2 squares to show (2x)(x). We first line up tiles on the sides to show 2x - 1 and x - 1.

Here we've filled in the space with 2 (x2) tiles.

Now we place 2 rectangular (-x) tiles horizontally below the blue x2 tiles to show that we are multiplying the 2 green (x) tiles on top by the one small (-) tile on the left side. We put them side by side in this example because the goal is to make a rectangle with the tiles, and this is the way they fit.

And then fill in that skinny little column on the right with another rectangular (-x) tile.
Lastly, to complete the rectangular puzzle, we plop one (+) tile in that tiny bottom right corner to show (-)(-) = +.
And that is it! If you have a large set of algebra tiles, you can pretty much multiply any two binomials. What would an x3 tile look like?
Additional resources:
Example 2:
Multiply (2x - 1)(x - 1)


Here we've filled in the space with 2 (x2) tiles.

Now we place 2 rectangular (-x) tiles horizontally below the blue x2 tiles to show that we are multiplying the 2 green (x) tiles on top by the one small (-) tile on the left side. We put them side by side in this example because the goal is to make a rectangle with the tiles, and this is the way they fit.

And then fill in that skinny little column on the right with another rectangular (-x) tile.
Lastly, to complete the rectangular puzzle, we plop one (+) tile in that tiny bottom right corner to show (-)(-) = +.
And that is it! If you have a large set of algebra tiles, you can pretty much multiply any two binomials. What would an x3 tile look like?
Additional resources:
Here is puzzle #5 of a multiplying polynomials digital math escape room. It presents polynomial multiplication as the side lengths of rectangles, the wall lengths of blueprints and as straightforward polynomial multiplication problems. To meet the needs of students working online, I've made over 50 of these digital math escape rooms, all built in Google Forms to be super easy to send to students.
 |
| Multiplying polynomials digital math escape room |
If you'd like to learn more about ways to use algebra tiles, I have put together an algebra tiles tutorial video that covers ways to use algebra tiles in middle school math.
Using Algebra Tiles in Middle School Math:
 |
| watch video |


I love this idea!!!
ReplyDeleteI think on example two you should have put a positive small square.
(2x+1)(x-1)=
2x^2-2x+1x-1=
2x^2-1x-1
Final answer: 2x^2-1x-1
Thank you! I need you in my corner before I push publish! I think it's all fixed now. I really appreciate you pointing that out!
Delete